How to Apply for a Passport Online in India

Applying for a passport online in India requires one to register on the Passport Seva portal and follow a few simple steps. The online experience is seamless, though you will need to visit the Passport Seva Kendra or a Regional Passport Office physically to complete the process after taking an appointment online. The Ministry of External Affairs has provided a dedicated online service called Passport Seva that lets citizens apply for a passport online. It reduces the time you will need to spend at the passport office and makes the whole process a lot more convenient.

This article shows you how to apply for a passport online in India with a step-by-step guide.


How to apply for a passport online in India

Before getting started with the process of applying for a passport online in India, it is worth noting that you will need to keep your original documents ready to carry along while visiting a Passport Seva Kendra or a Regional Passport Office for your appointment. The list of required documents for applying for a passport has been made available online. After you apply for a passport online, you will get 90 days to visit a Passport Seva Kendra failing which you will have to resubmit your online application. Here are the steps to apply for a passport online.

Visit the Passport Seva portal and click on the Register Now link.

  1. Enter your details accurately and select the passport office you would like to visit.
  2. Once the details are entered, type the Captcha characters and then click on the Register button.
  3. Now, login to the Passport Seva portal with your registered login ID.
  4. Click the Apply for Fresh Passport/ Re-issue of Passport link. It is important to note that while applying under the Fresh Issuance category, you must have never held an Indian passport in the past. Otherwise, you should apply under the Reissue category.
  5. Fill in the required details in the form that appear on the screen and click Submit.
  6. Now click on the Pay and Schedule Appointment link on the View Saved/ Submitted Applications screen. This will let you schedule your appointment. You also need to pay a fee online for your appointment.
  7. Click on the Print Application Receipt link to print your application receipt.
  8. You will receive an SMS message with the details of your appointment.
  9. Now, you just need to visit the Passport Seva Kendra or Regional Passport Office where the appointment has been booked. Make sure to carry your original documents along with the application receipt. It's not mandatory to carry the physical application receipt if you can show the SMS message you received on your phone after taking the appointment online.

Please note that the government has also made it mandatory for applicants visiting a passport office to follow COVID-19 protocols. Applicants are advised to wear a mask, carry a sanitiser, download and install Aarogya Setu app, and follow social distancing norms during their visit.

Instagram DM Tricks: How to Add Special Effects to Instagram Messages

Did you know you can now use cool new special effects for your Instagram DMs? With a recent software update, Facebook has merged Messenger with Instagram DMs, and since then the latter has received some cool new features such as the ability to set up a custom chat colour, vanish mode, custom emoji reactions etc. In this article, we'll be telling you about one of these new features that came with the merger.


How to Add Special Effects to Instagram Messages


Instagram DM: Add special effects to messages

You can now add special effects in Instagram DMs, whenever you reply to someone or you send someone a new message. Follow these steps.

  1. First up, make sure that you have got the latest version of Instagram installed on your phone.
  2. Open any chat on Instagram and type a message.
  3. Tap the magnifier on the left, next to the text entry field.
  4. You'll now see four new effects to choose from.
  5. Tap and choose the one you like and that's it.
  6. Doing this will send a message along with the special effect.

Apart from this, you can also save messages to use as quick replies. To do that, follow these steps.

  1. To save a sent message, long-press on it and tap Save.
  2. You'll be asked to assign a shortcut, enter it and hit Save.
  3. To save a received message, long-press on it > tap More > tap Save. Assign a shortcut command to it, and that's all.
  4. Now whenever you want to send a quick reply, simply use the shortcut instead of typing the complete phrase.

This is how you can make the most out of Instagram DM's by adding cool special effects and saving quick replies.

Explained: WhatsApp’s new privacy policy and what you can do about it

Users have until February 8 to accept these new terms, WhatsApp meanwhile has reiterated that all messages are end-to-end encrypted.

A new notification has been popping up on everyone’s WhatsApp telling them that it's terms and policies are being updated. Users have until February 8 to accept these new terms, and WhatsApp has indicated that users may not be able to access their WhatsApp accounts if they do not accept the new terms and agreements (updated on January 4).

Explained: WhatsApp’s new privacy policy and what you can do about it

What is WhatsApp sharing with Facebook?

Facebook-owned WhatsApp’s updated policy says that it may share your information with its family of companies to “facilitate, support and integrate their activities and improve our services.”

Whatever information WhatsApp automatically collects from you will be shared with Facebook. This includes your mobile phone number and basic information you give when you create a WhatsApp account.

It also collects and shares user activity, how often you use WhatsApp, features you use, your profile photo, your status and ‘about’ information.

It also collects device-level information like what device you use, your mobile network, IP address, among others. It also collects and uses precise location information from your device, but with your permission.

“We may use the information we receive from them, and they may use the information we share with them, to help operate, provide, improve, understand, customize, support, and market our Services and their offerings, including the Facebook Company Products,” WhatsApp says.

Your information could also be used by Facebook and its other products to make suggestions for you, personalize features and content, help you complete purchases and transactions, and show relevant offers and ads across the Facebook Company Products

The Facebook products include Facebook, Messenger, Instagram, Portal-branded devices, Oculus Products, Facebook Shops, Spark AR Studio, Audience Network, NPE Team apps and any other features, apps, technologies, software, products or services offered by Facebook Inc.

What about your messages?

WhatsApp has reiterated that all messages are end-to-end encrypted. This means that neither WhatsApp, not third parties will access or read your messages.

“Nothing you share on WhatsApp, including your messages, photos, and account information, will be shared onto Facebook or any of our other family of apps for others to see, and nothing you post on those apps will be shared on WhatsApp for others to see,” WhatsApp says.

WhatsApp doesn’t store your messages once they’ve been delivered. Messages are stored on the user’s device and not on WhatsApp’s servers. Once messages are delivered, they are deleted from its servers.

In the course of delivering a message, WhatsApp’s servers store undelivered messages in encrypted form for up to 30 days and if a message is still undelivered after 30 days, WhatsApp claims to delete it.

“When a user forwards media within a message, we store that media temporarily in encrypted form on our servers to aid in more efficient delivery of additional forwards,” WhatsApp adds.

What about your transaction data?

Now that WhatsApp has launched a payments feature in India, it says that if you use WhatsApp Pay, additional information, including payment account and transaction information is processed by the company. This is information required to complete the transaction such as payment method, shipping details and transaction amount.

“If you use our payments services available in your country or territory, our privacy practices are described in the applicable payments privacy policy,” it adds.

What about ads?

WhatsApp does not allow third-party ads on its services. “We have no intention to introduce them, but if we ever do, we will update this Privacy Policy,” it says.

However, WhatsApp can use information it has about you to communicate to you about its services and market its services and those of other Facebook companies.  

What about businesses and third-part services?

WhatsApp recently launched WhatsApp Business, which allows businesses to contact and communicate with customers through its app. This could include making purchases through the app, or businesses contacting you, sending you order confirmations, flight tickets, tickets to other events, etc.

While chats between you and a Business are end-to-end encrypted, WhatsApp says that once the message is received, it will be subject to the business’s own privacy practices.

“Some businesses will be able to choose WhatsApp’s parent company, Facebook, to securely store messages and respond to customers. While Facebook will not automatically use your messages to inform the ads that you see, businesses will be able to use chats they receive for their own marketing purposes, which may include advertising on Facebook. You can always contact that business to learn more about its privacy practices,” WhatsApp says.

What choice do you have?

To continue using WhatsApp, you need to accept the new terms and conditions. If you do not wish to, WhatsApp too, suggests deleting your account.

For users who have already accepted the new terms and conditions, but do not want WhatsApp to share data with Facebook, or other businesses, they will have an additional 30 days to opt out and delete their account.

What happens if you delete your account?

WhatsApp says that when you delete your WhatsApp account, your undelivered messages are deleted from its servers along with any of your other information it no longer needs to operate and provide its services.

However, users must ensure they not only uninstall WhatsApp, but must delete their account from WhatsApp. This can be done by going to settings > Account and selecting ‘Delete my account’.

“Please remember that when you delete your account, it does not affect the information other users have relating to you, such as their copy of the messages you sent them,” WhatsApp’s privacy policy adds.

How to customize in-app notifications in WhatsApp for iPhone

 Buzzing, beeping, and ringing, what to do when WhatsApp is telling you what’s up.

Your phone is probably constantly buzzing, beeping, and vibrating because of various alerts that pop up from other apps on your phone. It can be hard to know which alerts are coming from where. WhatsApp will let you customize the notifications and alerts you receive so it’s easy to know who is contacting you without even having to look at their name. You can change the notifications and alerts for individual contacts, all messages, all group messages, or all calls that come through WhatsApp.

How to customize in-app notifications in WhatsApp for iPhone

Like most apps on the iPhone, notifications are a little different when you are actually in the app. If you are chatting with your friends or editing your contact list you don’t want to miss important notifications from people. You can customize these in-app notifications in WhatsApp with just a few simple taps on the screen.

How to change the alert style of in-app notifications in WhatsApp for iPhone

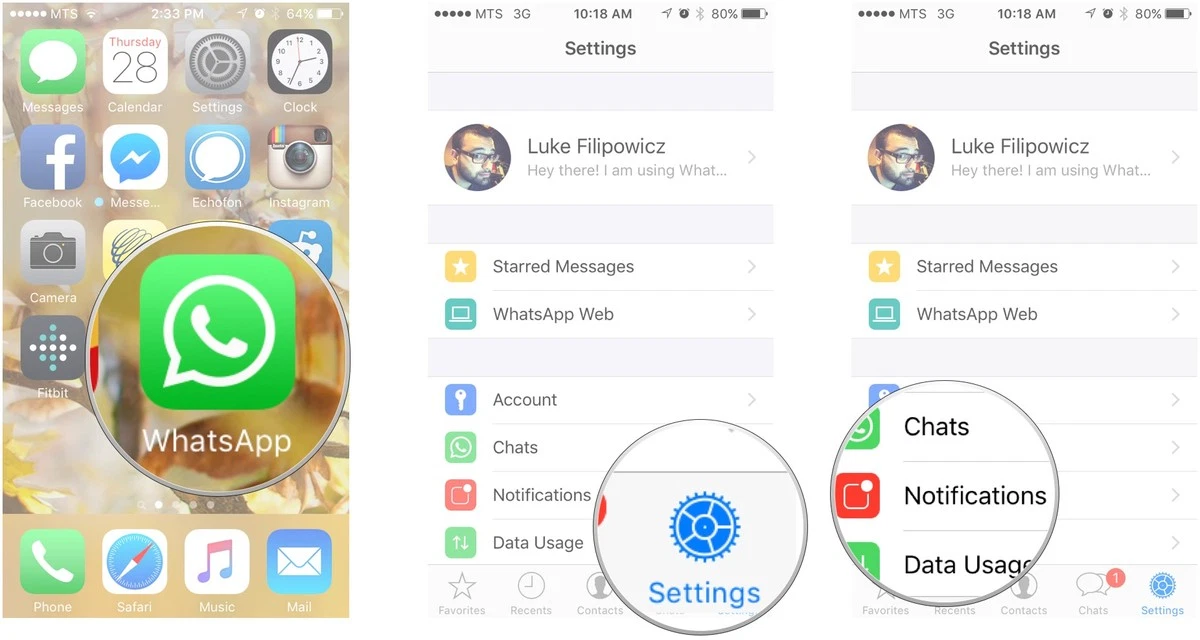
1. Launch WhatsApp from your Home screen.

2. Tap on the Settings tab. It is the gear icon located in the bottom left corner of your screen.

3. Tap on the Notifications button.


How to customize in-app notifications in WhatsApp for iPhone

4. Swipe up to scroll down the menu until you see the In-App Notifications button.

5. Tap on the In-App Notifications button.

6. Tap on the type of alert you want. You have three options:

  • None
  • Banners
  • Alerts

This will affect the type of visual notification you will see when you are in WhatsApp but not when you are on the Home screen or anywhere else on your phone.

How to turn sounds on or off for in-app notifications in WhatsApp for iPhone

1. Launch WhatsApp from your Home screen.

2. Tap on the Settings tab. It is the gear icon located in the bottom left corner of your screen.

3. Tap on the Notifications button.

4. Swipe up to scroll down the menu until you see the In-App Notifications button.

5. Tap on the In-App Notifications button.

6. Tap the On/Off button which is located beside the word sounds.

This button will turn on or off all sounds. If the white circle is over to the right and has a green trail behind that means it’s on. If the white circle is over to the left and there is no green around it that means it’s off.

How to turn vibration on or off for in-app notifications in WhatsApp for iPhone

1. Launch WhatsApp from your Home screen.

2. Tap on the Settings tab. It is the gear icon located in the bottom left corner of your screen.

3. Tap on the Notifications button.

4. Swipe up to scroll down the menu until you reach the In-App Notifications button.

5. Tap on the In-App Notifications button.

6. Tap the On/Off button which is located beside the word vibrate.

This button will turn on or off all sounds. If the white circle is over to the right and has a green trail behind that means it’s on. If the white circle is over to the left and there is no green around it that means it’s off.

iOS 14: How to Enable Back Tap on iPhone

Want to know how to take a screenshot on iPhone without hitting any buttons? Read on.

Did you know your iPhone has a cool hidden feature that lets you trigger certain actions whenever you tap the rear panel of your phone? For instance, 

you can now take a screenshot by double tapping or open the camera by triple tapping the rear panel of your iPhone. With the new back tap feature in 

iOS 14, the entire rear panel of your iPhone basically transforms into a big touch-sensitive button, letting you interact with your phone like never before.

Apart from the available actions present in the Back Tap menu, the feature also integrates well with Apple's Shortcuts app. This further makes it possible 

to assign almost any action that's available as a shortcut on the internet. In this guide, we tell you how to use the new Back Tap feature in iOS 14.


iOS 14: How to enable and use back tap feature

Do note that this feature only works on iPhone 8 and newer models running iOS 14. Additionally, this feature is not available on the iPad. With that being said, 

follow these steps to enable back tap on your iPhone.

  • On your iPhone, go to Settings.
  • Scroll down a bit and go to Accessibility.
  • On the next screen, under Physical and Motor, tap Touch.
  • Scroll to the end and go to Back Tap.
  • You'll now see two options — Double Tap and Triple Tap.

You can assign any action that's available in the list. For example, you can set the Double Tap action to take a quick screenshot, while the Triple Tap action can be assigned to quickly access the Control Centre. After you've assigned the actions, exit settings. You can now start using back tap on your iPhone.


iOS 14: Back tap integration with Shortcuts

Back tap also integrates well with the Shortcuts app. This means, besides having the actions that are already present in the back tap menu, you can also assign 

custom shortcuts if you want to. For instance, if you have a shortcut that lets you run the Instagram story camera from the Shortcuts app, you can now assign it to a simple double- or triple-tap.

All you need to do here is to make sure to download Apple's Shortcuts app on your iPhone. Once the app is installed on your phone, visit RoutineHub to get a plethora of custom shortcuts. To download a shortcut and assign it to back tap on your iPhone, follow these steps.

  • Go to RoutineHub on your iPhone.
  • Find the shortcut that you'd like to download and open it.
  • Hit Get Shortcut to download it on your iPhone.
  • Doing this will redirect you to the Shortcuts app. Scroll down to the bottom and tap Add Untrusted Shortcut.
  • Exit the Shortcuts app once your new shortcut is added.
  • Go to iPhone's Settings and repeat the earlier steps to assign this new shortcut as a double tap or a triple tap action.

This is how you can enable and use the new back tap feature in iOS 14. Let us know in the comments what you plan to do with this nifty new feature.

WhatsApp Pay goes live on UPI; available in 10 regional languages

NPCI has allowed WhatsApp to start with a maximum registered user base of 20 million in UPI and expand its user base gradually in a graded manner.

WhatsApp has finally launched services on the United Payments Interface (UPI) in a major boost for the Facebook-owned app in its biggest market. The National Payments Corporation of India (NPCI), India’s flagship payments processor, on November 5 permitted WhatsApp to go live on UPI.               


WhatsApp Pay


WhatsApp can expand its UPI base in a graded manner starting with a maximum number of registered users at 20 million, the NPCI said in a statement.

In a video statement on November 6, Facebook CEO Mark Zuckerberg said that sending money through WhatsApp is as easy as sending a message.

"There’s no fee, and it’s supported by more than 140 banks. Payment is available now in available in 10 Indian regional language versions of WhatsApp," Zuckerberg said.


n a statement, WhatsApp said that it has been designed with a "strong set of security and privacy principles, including entering a personal UPI PIN for each payment."

Payments on WhatsApp is now available for people on the latest version of the iPhone and Android app.

Also read... WhatsApp Pay Explained: How to set it up, how to send and receive money, how it works and other questions answered

WhatsApp’s popularity in India poses a threat to established players, but it is entering a fiercely competitive and crowded market that has the likes of Google, and Alibaba and Softbank-backed Paytm providing a gamut of payment services.

Meanwhile, the NPCI on November 5 announced that third-party app's transaction volume in UPI will be capped at 30 percent.

The cap of 30 percent will be effective from January 1, 2021, and it will be calculated on the basis of the total volume of transactions processed in UPI during the preceding three months.

WhatsApp Pay Explained: How to set it up, how to send and receive money, how it works and other questions answered

In a decision that will have a huge impact on India’s payments space, NPCI has allowed WhatsApp to go live on its United Payments Interface.

You use it to stay in touch with family, friends and work and now WhatsApp will also allow you to make payments, which the company said will be as easy as forwarding a message.

The National Payments Corporation of India (NPCI), India’s flagship payments processor, on November 5 allowed Facebook-owned WhatsApp to go live on its United Payments Interface (UPI).

WhatsApp Pay


With more than 400 million active users, India is the biggest market for WhatsApp and its entry into the payments space is bound to have a huge impact on the country’s digital payments landscape. To begin with, WhatsApp Pay can expand its UPI base with a maximum of 20 million users, the NPCI has said.

Here are answers to some essential questions that might be on your mind:

How can I get started with WhatsApp Payments and how do I send and receive money?

WhatsApp Payments runs on the Unified Payments Interface (UPI) platform. It allows users to transfer money instantly, directly between bank accounts. There is no need to create a wallet separately.

All you need is a debit card, open WhatsApp, click on 'Payments' in the attachment segment, authenticate yourself with the debit card number, create a UPI handle and generate a UPI pin. That’s it and you are good to go. Do remember the card that you use, as future transactions will happen from that bank account.

When can I get started?

If you are among the one million users who signed up for the beta-testing app, you are already on. Others can sign up from November 6.

How does it work?

Get on to the chat window with the person whom you need to transfer money to. Click on ‘attachments’, select ‘payments’, enter the amount to be transferred and authenticate using the UPI pin.

Just make sure that the receiver has updated the app to receive UPI payments.

Even if the receiver does not use WhatsApp Payments, you can still send money to any UPI ID the person might have, as UPI is interoperable.

What are the other UPI IDs that one can have?

Anything will work whether it is with Google Pay, PhonePe, Paytm, or any of the 189 banks that can issue UPI handles. Typically a user’s UPI ID is designed like an email ID: unique identifier@bank handle. UPI is a direct settlement between bank accounts and does not require a separate mobile wallet to be created.

Which are the banks WhatsApp is working with?

Consumers having an account with any of the 189 banks can use UPI. WhatsApp is working with five banks—State Bank of India, Axis Bank, HDFC Bank, ICICI Bank and Jio Payments Bank—and will issue handles with any one of these banks.

How will the 20-million user limit work?

One million people are already using WhatsApp Payments, for them it will continue normally. Now 19 million new users can join the platform. Once the 20 million limit is reached, WhatsApp will have to stop onboarding new users. However, NPCI is expected to extend the limit after due consideration.

Can I use WhatsApp to shop on Amazon or Flipkart?

Yes, one can use the WhatsApp payment handle to shop as well but, as of now, these integrations are not there. Eventually, WhatsApp Payments, like GPay, will be seen as a payment option during checkout.

iPhone 12 Camera Module Can’t Be Replaced by Third-Party Technicians - Reports

iPhone 12 reparability test by iFixit reveals that the camera module on the latest Apple offering is not swappable. If the iPhone 12 camera module is transferred to another iPhone 12, it becomes entirely unusable. iFixit says that Apple may be looking to come down hard on third-party repairs with this iPhone 12 camera issue. Furthermore, Apple's internal training guide accessed by iFixit ascertains that this isn't a hardware defect but is a software tweak that Apple may or may not have intentionally introduced. The guide explains to authorized technicians that they will need to run Apple's proprietary cloud-linked System Configuration app to fully repair cameras and screens on iPhone 12 and later phones.


iphone-12-camera-module-third-party-repair-unreliable-ifixit-teardown


In its report, iFixit says that when an iPhone 12 camera is transferred to another iPhone 12, it doesn't work reliably at all. The report explains that it appears to work initially, but ‘fails miserably in actual use.' After the swap, the camera only responds to certain modes, hangs occasionally, refuses to switch to ultra-wide mode, and becomes completely unresponsive on some occasions.


It should be noted that the same behavior does not get repeated when the iPhone 12 Pro cameras are swapped, and it only seems to be affecting iPhone 12 units. This could be a software tweak that Apple may have unintentionally introduced, and a fix may be rolled out now that the problem has been called out. However, given Apple's known discouragement against repairing its devices with third-party technicians, this little tweak – if introduced intentionally – doesn't come as too much of a surprise.

iFixit also dug into Apple's authorized internal training guides for iPhone 12. It explicitly tells technicians that starting with iPhone 12, they will need to run Apple's proprietary cloud-linked System Configuration app to fully repair cameras and screens.

Google Meet Rolling Out Custom Background Feature for Desktop Users

Google Meet has started rolling out a new feature that allows desktop users to change their backgrounds during a video call. The platform has introduced a set of default images that video callers can use to change the background. It includes office spaces, landscapes, and abstract backdrops. Google also offer the option to upload your own image as a background. The feature has been rolled out previously by competitor Zoom, and even Skype introduced it earlier this year. It is being rolled out for desktop users in a phased manner.

Google announced the new feature In a blog post. The search giant said that custom background feature will work on ChromeOS and on the Chrome browser on Windows and Mac desktop devices. Users do not require an extension or any additional software for this to work. Google Meet mobile app users are expected to get the feature sometime soon. Google said that it may take up to seven days for eligible devices to see this feature.

Google Meet


The custom background feature is rolling out for Google Meet Essentials, Business Starter, Business Standard, Business Plus, Enterprise Essentials, Enterprise Standard, Enterprise Plus, Enterprise for Education, and non-profit customers and users with personal Google accounts. Furthermore, the functionality of uploading your image as background is not available to participants of meetings organized by Education customers.

The background changing feature is turned off by default and needs to be enabled by the user. Google also said that changing the background may slow down your device.


How to change your background in Google Meet (desktop)

To change your background in Google Meet on Windows and Mac, follow these steps:

  • If you want to change the background before a video call, Go to Google Meet > select a meeting > Change Background. You can join a meeting after that.
  • To change the background during a video call, click on the More option (three dots) on the bottom right corner and then click on Change Background. Google specified that your camera will automatically be turned on when you select the option.
  • To select a pre-uploaded background, you can choose one from the listed options. To upload your own image for your background, click on Add.

How to repost a story on Instagram

Reposting Instagram story is not so easy. We'll be explaining, how to to repost a story on Instagram.

Reposting a story on Instagram lets you share other peoples' posts as your own. You can do this for photos and videos in which you've been mentioned or not, and in this article we are going to give you two methods that let you do so. Besides telling you how to repost an Instagram story, we have also compiled a list of some amazing tips to spice up your Instagram stories.


Instagram: How to repost a story - Method#01

The first method to repost a story on Instagram is the easiest. To repost someone's photo or video as your Instagram story, follow these steps.

  1. Open Instagram and select the photo or video that you want to repost.
  2. Hit the Share icon right below the post > tap Add Post to Your Story > tap Your story.

Follow these steps to repost from a user's profile who has disabled the option for sharing their photos or videos. However, it is always recommended to always ask for permission before sharing anyone's Instagram post. With that being said, here's what you need to do.

Instagram: How to repost a story - Method#02

  1. Open Instagram and select the photo or video you want to repost as your story.
  2. Tap the ellipsis(i.e., three-dots icon) > select Copy Link > minimize the app.
  3. Now, visit ingramer.com.
  4. Once the site is loaded, hit the hamburger icon and under Tools, select Instagram Downloader.
  5. Next, you paste the copied link under Download photo or Download video, depending on the type of post you want to share.
  6. Hit Search and scroll down to download the post.
  7. Once your stuff is downloaded on your phone, go to Instagram > tap the camera icon > select the downloaded photo or video.
  8. Now edit the photo according to your liking and once you're all set, tap Send to and hit Share, right next to Your Story.


Instagram: Creative tips to repost stories

Here are some amazing tips that will make your Instagram stories look cool and are also pretty easy to follow.

1. Change background color

To change the background image in an Instagram story, follow these steps.

  1. Prepare your Instagram story > hit the draw icon > choose the color selector tool.
  2. Now, choose from the colors that are already available or you can choose your own by using the color picker tool.
  3. Once you have your color selected, all you have to do is tap and hold in an empty area around your post and your background colour will be changed.

2. Use custom fonts

Everyone uses the fonts available on Instagram, but let us tell you how to use custom fonts.

  1. While preparing your Instagram story, hit the sticker icon and select GIF.
  2. In the search bar, type collage alphabets or collage letters to get GIFs for English alphabets.
  3. Now use each letter to create a word or a sentence, the choice is yours.

3. Create drop shadows

Did you know you could create your own drop shadows with the help of available fonts on Instagram? Let us tell you how.

  1. Prepare your Instagram story > hit the text button > use the font of your liking to write anything. For instance, new post.
  2. Now repeat the steps and write the same steps, but this time using a different colour.
  3. Layer both the text on top of each other in a slightly off-centered manner so that you can see both the texts, hence creating a drop shadow effect.

4. Use GIFs

A good GIF can add that needed zing in any post. Here's how to use them.

  1. Prepare your Instagram story > tap the sticker icon > tap GIF.
  2. Search for any GIF by typing in a keyword.
  3. Now use your imagination and make out the most from your IG story by using GIFs.

5. Add a glow

Follow these steps to add a glow to your photos in Instagram stories.

  1. Choose a photo from your gallery > prepare your Instagram story > tap the draw icon.
  2. Tap the glow pen and choose your preferred color.
  3. Now, draw zig-zag lines around your photo.
  4. Once done, use the eraser tool to remove the lines that are on the photo.
  5. The final result you're left with is your photo with glowing streaks around them.

How to Fix Slow Wi-Fi, Connection Problems, Internet Speed

Most of us getting frustrated when internet speed slow these days 😅

Slow Wi-Fi can be very annoying especially if you're studying or working from home. Slow internet speed can ruin your day whether you need to upload work-related files on the cloud or even if you need to stream your favorite show on Netflix. Thankfully slow Wi-Fi is a problem you can fix. In most cases slow Wi-Fi can be fixed in a few easy steps.. Follow this guide as we list out a few methods to fix Wi-Fi connection issues.

How to Fix Slow Wi-Fi, Connection Problems, Internet Speed
Slow Wi-Fi: How to fix

There are many factors at play that may result in slow Wi-Fi to be slow. These are some of the methods that you can follow to identify and fix Wi-Fi connection issues.

1. Do you have slow Internet speed?

Before jumping into conclusions that you're struggling with slow internet speed, make sure that the advertised speed of your internet plan matches with the internet speed that you're getting. To do that, visit any website that lets you measure internet speed such as speedtest.net or fast.com. If the speed results match with the advertised speed provided by your ISP (Internet Service Provider), we'd say that your connection is absolutely fine and in order to speed things up, you can always go for an upgraded plan that offers faster internet speeds.

2. Restart Wi-Fi router to fix Wi-Fi issues

Sometimes all you need to do with your Wi-Fi router is a quick restart to fix Wi-Fi connection problems. Simply turn off your Wi-Fi router and then turn it on after a few seconds and then check if you're still getting slow internet speeds. If that doesn't fix Wi-Fi issues, try restarting your computer, phone, or other devices. Sometimes the reason for slow Internet speed may just be one of your devices, and not the Internet connection.

3. Positioning the Wi-Fi router could fix slow Wi-Fi

Are you still facing slower internet speeds despite having a high-speed internet connection and a good enough Wi-Fi router? The problem could be with the positioning of your router. It is always recommended to place the router at a higher place, such as above the wardrobe. Besides, you can always place the Wi-Fi router at different spots in your house or workplace to see which area gets the best signal strength before finalising on a spot. Do note, generally Wi-Fi signals are able to pass through walls and other objects, but in some instances thicker walls or some metals do obstruct the signals. In such scenarios, it is always recommended to keep your router away from microwave ovens or refrigerators, and as we mentioned above, position the router at an elevation and an optimal spot.

4. Adjust the router's antennas

Positioning the antennas on a Wi-Fi router straight up redirects the Wi-Fi signals in a single direction. That's why you should always point the antennas in different directions. For instance, many Wi-Fi routers come with two or three antennas. In such a scenario, make sure to point the antennas in vertical and horizontal directions, so that the Wi-Fi signals can cover a wider area.


5. Use a strong Wi-Fi security standard

If your Wi-Fi's security is not strong enough, it could be easy to gain access to the password. our neighbour might be stealing your Wi-Fi connection, and that may be why you have slow Wi-Fi. Therefore, it is always suggested to use WPA2 security protocol on your router. You can change this via your router's settings. To set a WPA2 password, access your Wi-Fi settings by entering your router's IP address in any browser on your phone or computer. You can find your router's IP address at the back of the router, or else you can also look for it by accessing your Wi-Fi's network settings on your phone or computer.

6. Single connection, multiple users

You might have a high-speed internet connection that's shared by multiple users in your house or your workplace, and while a Wi-Fi router doesn't slow the internet speeds when multiple people use it, your available bandwidth does get compromised. What this means is that you could be downloading files from the cloud, while your kid could be downloading that latest game from the PlayStation Network, all while your partner could be streaming their favourite movie or TV show. In such a scenario, all of you could face slow Wi-Fi since each device is using a significant chunk of the available bandwidth.

In this case you could try reducing the load on the Internet connection by pausing any one of the streams or downloads. This could lead to improved Wi-Fi speeds for others. Modern routers support technology that ensures equal bandwidth across all devices, and if you're facing issues even with one of those routers, the bottleneck may be your Internet speed.

7. Using QoS to fix slow Wi-Fi

One of the best tools available that is often overlooked is QoS or Quality of Service, whose job is to basically divide the available bandwidth on your Wi-Fi network between applications. With an optimum setting, you can watch that wildlife video on YouTube in 4K resolution without any stutter all while ensuring that your latest game gets downloaded on Steam. With QoS, you can decide which service to prioritise on your Wi-Fi network and hence dividing the bandwidth accordingly. Do note, there are different ways to access QoS settings for routers, which means the way to access QoS on a Netgear router will differ from that of a TP-Link router. To check your router's QoS settings, enter your router's IP address in a browser and look for the QoS tab to access the settings.

8. Update router's firmware to fix Wi-Fi connection issues

Software updates for your router are very important since they improve its stability, performance and security. Most of the routers available these days come with the ability to update themselves automatically, however if you're having an old router, you might have to install the software updates manually. Different routers have different ways to update the software. To find out more, enter your router's IP address in any browser on your phone or computer to access Wi-Fi settings for your router.

9. Changing the DNS server

Every ISP irrespective of their different internet plans uses a DNS (domain name system), which basically helps translate the IP address of servers into domain names such as youtube.com or facebook.com. Mostly, the default DNS server provided by ISPs is slow and unreliable, and this is why simply changing your DNS server can give you that sigh of relief and a much-needed gain in your internet speed and performance. To learn how to change DNS, you can check out our guides on how to change DNS on iOS, or on your computer. For those who use Android, go to the Wi-Fi settings on your phone and look for the Private DNS option. By default, it is turned off on most Android phones, but you can choose to set it on Automatic or you can even do the settings manually by hitting Private DNS provider hostname.

10. Use a Wi-Fi analyser

A Wi-Fi analyzer app can be a potent tool in determining the best channel that's less crowded and offers minimal interference. There are two main bands used in Wi-Fi communications — 2.4GHz and 5GHz. The 5GHz band is less crowded but it has lower range, so keep that in mind when analyzing the results of these tools. These bands are further divided into multiple channels and this is where a Wi-Fi analyzer helps in finding out which Wi-Fi networks are broadcasting on the same channels so that you can opt for an alternate one. There are various free and paid Wi-Fi analyzer apps available on the internet that can help you in solving such issues. You can check out some of the popular Wi-Fi analyser options for phone and computers such as NetSpot, InSSIDer, NetX and Network Performance Monitor to name a few.

11. Change your Wi-Fi channel

If you find out your router's IP address and use it to access your Wi-Fi settings in any browser, you'll come across channels under wireless settings. There are a total of 14 channels and the first thing you need to find out is which Wi-Fi channel is the most utlised in your area. Once you determine that, you can always try to find and choose a non-overlapping channel which is spaced far enough from the other channels. Most of the ISP's set the channel settings to automatic, but if you're having slower internet speeds then we'd say you fiddle around and find out the clearest channel for yourself for the best optimal experience.

12. Reset your device's network settings

If resetting your Wi-Fi router doesn't solve your problem, you should probably consider resetting your device's network settings. By resetting the network settings of your device, you'll basically be setting them to default. From there, you can reconfigure your Wi-Fi on all your devices and check if doing this solved your problem. The steps vary for each device and you will have to re-enter your Wi-Fi password to use the Internet.

13. Purchase a new Wi-Fi router

Getting a high-speed internet plan doesn't solve the quest for getting high internet speeds, instead your Wi-Fi router also has a big role to play. You see, you can get a high-speed internet plan, but you can't make the most out of it if your Wi-Fi router is old or doesn't comply with the new Wi-Fi standards. To fix this problem, try getting a new Wi-Fi router that supports 802.11ac (popularly known as Wi-Fi 5) or at least 802.11n (also known as Wi-Fi 4). However, if you're looking for a superfast Wi-Fi router, you can also purchase one that supports the latest 802.11ax standards (known as Wi-Fi 6). Although keep in mind that since this technology is still under development, routers that support Wi-Fi 6 standards are actually very expensive.

14. File a complaint with your ISP

If none of the methods mentioned above works out for you, then you should probably contact your ISP and let the professionals take care of the problem. Sometimes it is always better to simply call and file a complaint rather than trying to fix things on your own, and if your ISP has a good track record with customer service, your problem might be fixed in minimal time.

15. Change your ISP

If your current ISP isn't able to serve your needs in your area and you're still constantly dealing with slow internet speeds, then your last resort would be to look for a better connection and change to that. In such a scenario, it is always better to do some research and find out which connection provides the best price-to-performance ratio in your locality. It is also good to talk to your neighbours as well and see which connection they are using and how well it is serving them.