5 Facebook Tricks You Need To Know

 Facebook widely known as FB  most of us use it almost everyday, doing pretty much the same things over and over again. Updating status, checking out friends’ profiles, downloading and uploading pictures and the occasional messaging, group chatting etc.

But, while most of us use Facebook everyday, the fact is that most of us also haven’t really tinkered with how all the above things in Facebook can be done a bit differently, more easily, more conveniently and maybe with a little less time and effort.

Here are 10 Facebook usage tricks that we believe will definitely help you enjoy a new and better Facebook experience.


Change your Status Update Font in Facebook

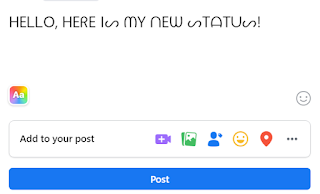
The next time you post your status update, do something cool and change your update’s font. By default, Facebook gives you only one font. It is nice but everyone uses the same font! Where is the fun in that! Head over to this Facebook font page changer page on the web. Once there, type in your update and then copy paste one of the funky styles you see, right into your status update page in Facebook. Your updates can then look like this!


Sync your Facebook Calendar with Google Calendar

You would probably call your Google Calendar your secretary, wouldn’t you? That is how important Google Calendar has become for most people. Have you unsuccessfully tried to link one of your Facebook calendar events to your Google Calendar?  

It is actually very easy! Follow the steps below.

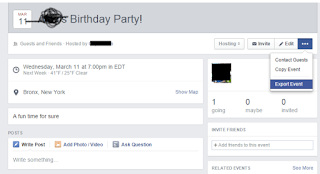
Go to Events in Facebook. Choose the upcoming tab and then click on the Options tab. Once there, you can choose the export event option as shown in the following picture.


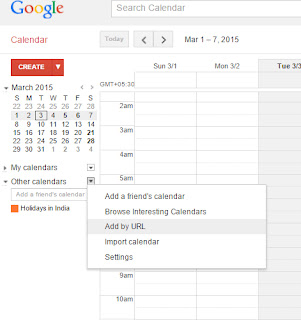
Once you have copied the address, head on over to your Google Calendar. On the left hand tab, you will see an option called Other Calendars. Click on the drop down arrow next to it and then choose “Add by URL” as shown below.


That’s it. Your Facebook Calendar event is now neatly synced into your Google Calendar, with all the details you had on Facebook.

Stump your Friends with a “Blank” comment!

The next time one of your favorite Facebook friends post a status update, you can head on over to their post and leave a blank comment. They will be stumped.

They will surely ask you what you intended to type after seeing your blank comment, like below. This little prank can be a great conversation starter if you think about it!

To leave a blank comment, hold down the Alt key on your keyboard and then type “0173”. Then, release all keys and press enter. You just left a puzzling blank comment!


Stop Facebook from Tracking Your Every Move

Did you know that advertisers on Facebook can target ads that will only show to you? Sounds scary, doesn’t it?

The truth of the matter is that it is happening as you read this. Since Facebook is free, it makes money by making its massive user base available for targeted advertising, something that earns them billions.


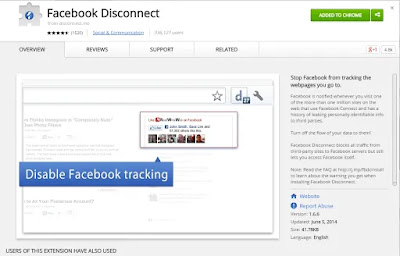
If you would rather not be a statistic that is constantly tracked by Facebook, install Facebook Disconnect, available for both Chrome and Firefox.

Enabling these extensions is pretty self-explanatory and, once activated, you can be assured that the relentless tracking from Facebook would have stopped.

Choose Who Sees You Online on Chat?

By default, when you are online and on chat, your name will have a green circle next to it, indicating that you are online and ready to chat away.

While you might be in the mood to chat with just some people on your FB friend list, chat initiations from certain friends or just acquaintances can rather be more of a nuisance. Once again, just like how you can selectively share your status updates with certain people, you can choose to be shown as online in chat only for some people.

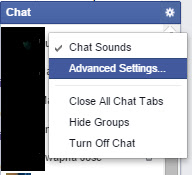
Click on the little Settings gear icon on the right hand corner in the small Chat window that you see at the bottom of Facebook.


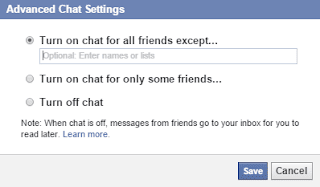
Once there, enter people that you want to be seen as available to chat with or leave out people who you don’t want to see you as online. Then, save the new settings and enjoy Facebook chat only with people you actually want to chat with!

25 Best Android Tips to Make Your Phone More Useful

Android is the most popular computing platform in the world, due in large part to its powerful open-source nature. Users have grown to love Android for the plethora of features and customization options, but sometimes it can all get a bit confusing. Google is always making tweaks and coming up with new features for Android, and OEMs like Samsung and LG can add their own stuff on top of that. It can be hard to keep up, so we’ve gathered the 25 best tips for your Android phone right here.


25 Best Android Tips to Make Your Phone More Useful


Configure Your Lock Screen

Android phones all offer various forms of secure lock screens. Most phones will prompt you to do this during setup now, and you should. The defaults are PIN, pattern, and password. Most devices now offer fingerprint security which will probably be the fastest way to unlock your device. To control your lock screen, head to the system settings, and find the Security menu. Some phones have a separate lock screen menu instead. You will need to have a secure lock screen to use features like Android Pay and factory reset protection.

Disable/Uninstall Bloatware

Most phones come with some apps pre-installed that you won’t want to keep around. Luckily, they can be dealt with these days. Some pre-installed bloat can be uninstalled normally by using the Play Store or finding it in the app settings menu. However, anything that’s part of the system image is non-removable. What you can do is disable it by opening the app menu from the main system settings and finding the app in your list. Right at the top will be a “Disable” button that removes it from your app drawer and prevents it from running in the background.

Find Your Phone

We have all occasionally lost track of a phone. Maybe it was hiding in the couch cushions or sitting on the kitchen counter. Don’t go crazy looking for your phone next time; just use Google’s “Find my phone” tool (previously known as Android Device Manager). You can access this via the web on a mobile device or computer. Simply log into your Google account, and choose your missing phone from the drop-down menu. Google reaches out and shows you where it is. You can also ring the phone, even if it’s in silent mode. If worse comes to worst, you can remotely erase the phone to protect your data.


Add Mobile Data Tracking

Data caps are common across mobile carriers, and data rates just keep getting faster. To make sure you don’t blow through your monthly allotment, visit the data usage menu in the system settings. Some phones call this something a little different, but it’s always right near the top. Here, you can set your plan reset date, create a warning threshold, and even have data automatically disabled when you’re about to incur an overage. If that’s not to your liking, Google has an app in the Play Store called Datally (pictured). It collects data from the settings menu, and it can limit background data with a nifty floating counter to track your bytes.

Choose Do Not Disturb Settings

Android’s notification settings are a bit confusing right now. Not only do OEMs often change the terminology, but Google itself has revamped it a few times in recent updates. You’ll find the settings for this feature either in your volume popup when you hit the toggle or by going into the system settings for notifications (usually Sound and Notification). It will be called Do Not Disturb on most devices. In this menu, you can choose when DND is toggled on automatically, what is blocked, and if any contacts are allowed to ring through anyway. On Pie devices, Do Not Disturb defaults to hiding your notifications as well. Make sure to change that setting if you still want to see what’s going on in the notification shade.

Digital Wellbeing

Maybe you spend too much time on your phone sometimes, but Android has some tools to help you avoid that. The Digital Wellbeing suite (Android 9 and later) shows you what apps you’ve been using, for how long, and offers ways to stop that from happening. The settings menu breaks down apps on a chart, and lets you set a time limit for apps you want to cut back. The chart tracks notifications and unlocks as well. There’s also a “Wind down” mode that slowly fades the screen to grayscale as bedtime approaches.

Make Sure Your Photos Back Up Automatically

There’s nothing worse than losing or breaking a phone only to realize your photos aren’t backed up. You can avoid this by simply opening the Google Photos app and following the prompts to enable auto-backup. The default mode is “high quality” and unlimited space. This compresses your photos, but they look surprisingly good. If you want to save the original image, you can opt to use your Drive storage space. You get 15GB free and can buy more.


“OK Google” Voice Match

Google search is at the heart of all Android phones, and you can start searching at any time just by saying “OK Google.” This works on the home screen and in the search box automatically, but if you go into the search settings, you can get OK Google working everywhere. In the search settings, go to Voice > Voice Match. Just turn on the “Access with Voice Match” option and the phone will have you say “OK Google” a few times to learn your voice. Now you can use the hot word any time the device is awake from any screen. Some devices also support this when the screen is off, while others only work when the device is awake.

Try a Different Home Screen

Most Android devices have a custom UI created by the device maker (eg. Samsung Experience launcher). That includes the home screen. This is an important part of the experience, and the default home often isn’t very powerful. Installing an alternative like Nova Launcher or Action Launcher can make your device much easier to use. You can use these apps to change the icons, assign navigation gestures, organize apps, and so much more. Any time you want to change between your installed home screens, just go to the Home menu in the system settings.

Google Assistant

Did you set up OK Google? If so, you’ve got two ways to access the Google Assistant. To access Assistant, use OK Google or long-press the home button. Then, just start talking. This feature was exclusive to the Pixel for a few months, but it has since rolled out to all Android phones running Marshmallow or higher. Assistant understands more context and natural language than Google’s old voice search feature, and it can be integrated with third-party services like IFTTT, Samsung SmartThings, and Nest. It’s great at home automation and searching the web, and it can even read you the news of the day.

Manage Apps on the Web Play Store

Google includes the Play Store client on Android devices, but there’s also a version of the Play Store accessible online. For some people, this is a no-brainer, but not everyone thinks to use the web-based Play Store. You can do all the same things here that you do on your phone, but faster. Apps and games can be purchased and pushed over the air to Android. You can queue up multiple installs in a fraction of the time it takes on Android. If you’ve got more than one device on your account, you can pick where the app goes.

Use Screen Pinning

If you need to hand your phone to someone else, you don’t necessarily want them snooping around in other apps. This is easy to prevent — just pin the screen. This should be enabled by default on most devices, but if it’s not, check the security menu. Tap the app icon on any app in the multitasking interface and you can select “Pin” to prevent them from switching apps. If you have a secure lock screen, you can require that unlock method to leave the pinned app.

Swipe Input on the Keyboard (most devices)

Tapping with your thumbs is okay as an input method, but most phones have swipe input built-in too. Give it a shot by dragging across the letters for each word. The accuracy varies by device, but you can also install a different keyboard that might suit you better. There’s Google’s Gboard, but others prefer something like SwitfKey with its plethora of settings.

Use Power-Saving Modes

All Android phones have power-saving modes of some sort — sometimes two or three of them. Head to the battery menu (usually just Settings > Battery) on most phones to see these settings. For example, Samsung offers a regular power-saving mode that reduces screen brightness and slows the CPU, then there’s also an ultra power saver that locks the device to just a few essential applications. Most phones, like those from Google, offer basic power saving modes like the former that can be turned on automatically when the device reaches a certain battery level. This is definitely something you should set up.

System Dark Theme

A lot of apps (particularly Google’s) have bright white styles. Starting in Android 10, there’s a system-wide dark theme that can toggle those apps and parts of the system UI to a nice, muted black. It’s available in the Display settings or more conveniently in the quick settings. Some phones also have options to schedule the dark theme so it flips on automatically every night and off in the morning. Only apps that have been developed for the theming API will work, but that list is growing by the day.

Manage Default Apps

Many actions on Android will ask you to set a default app, but what if you decide you don’t like that default anymore? Most phones today have a dedicated default app settings menu in the application settings, but you can always clear out those defaults by finding your default apps in the main app settings menu. When you look at the info page for an app, there will be an option toward the bottom to view and clear the defaults. That will let you select a new default the next time you perform an action.

Turn on Developer Options

Google hides some of the more advanced tools in a special Developer Options menu that you’ll have to enable to get at things like animation speed, USB debugging, and app standby. To turn on Developer Options, open the “About phone” menu at the bottom of the system settings and find the build number. Tap on that seven times and you’ll get a message that you are a developer. The dev options will now be at the bottom of your main system settings.

Rotation Lock Button

Rotation lock can be a bit touchy, flipping the screen around when you tilt the phone just a little too far. In Android 9 Pie, you can change the rotation setting to lock it in portrait mode but still have access to landscape mode. Start by disabling auto-rotate in the settings. Then, look for the rotation button at the bottom of the screen the next time you turn the phone sideways. Tap that, and it locks into landscape mode until you spin the phone back. Tap the button again, and it’s locked in portrait again.

Autofill Service

If you’ve got Android 8.0 or higher on your phone, you don’t have to type in a password ever again. Well, you’ll have to do it less. Visit your input settings and open the advanced menu to enable autofill for usernames and passwords. By default, you can enable Google’s autofill service, which is tied to Chrome. Third-party apps like LastPass and Dashlane also have support for this feature. Just tap in a login field in virtually any app, and your autofill app can add the matching username and password.

Screencasting

Do you have a $35 Chromecast or Android TV? If so, you can do more than stream video to it. Android devices can mirror the entire display onto your TV, and it’s essentially foolproof. On stock Android devices (and a few more) there is a Cast icon in the Quick Settings. Tap that and pick an output device to start mirroring your display. On other phones, just download the Chromecast app and use the screencasting feature included there.

Notification Channels

Starting in Android 8.0 Oreo, Google made it easier to cut down on the notification noise. Apps now have notification channels, so you can change how their various alerts appear (and whether they appear at all). To edit a notification channel, go to the app’s info screen or long-press on a notification and tap the settings gear to see all the associated channels. On Android 10, you can tap the “Turn off notifications” option to get a popup with available channels. Here, you can turn each channel on or off, change the way it appears, and more.

Customize Quick Settings

The quick settings are the settings toggles visible at the top of the notification panel (most devices) and in the fully expanded quick settings UI. On most devices, you can access them by swiping down twice. Customizing these is something everyone should do when getting a new device, and the process is much more consistent than it used to be. Google added customizable quick settings in Android 7.0, and OEMs often add a few more options to this area (like Samsung, above). Just open the quick settings and hit the edit button. Then, long-press and drag to rearrange. The first few settings toggles you have in the list will be accessible at the top of the notification pane prior to opening quick settings. App developers can also add tiles that show up in the editing interface. For example, Twitter apps have tiles to start a new Tweet and VPN apps have on/off toggles.

Use (and Remove) Factory Reset Protection

Way back in version 5.1, Android added factory reset protection, which is nice should your phone ever be stolen. The thief won’t be able to reset and log into the phone without first knowing your Google password. However, you might also accidentally lock the new owner out of your phone (or even yourself) if you sell it. Factory reset protection is enabled automatically when you have a secure lock screen enabled. Make sure you don’t reset your phone less than 24 hours after changing your Google password, or you’ll trigger a 72-hour anti-theft lockout. To disable reset protection for a new user to log into the phone, just disable the secure lock screen, enable OEM unlock in the Developer Options, or manually remove your Google account in the Accounts menu (this also factory resets the phone).

Sideload (Safe) Apps

The Play Store has plenty of apps, but if you want to branch out a little, there are safe ways to do that. First, head into the security settings on your device and enable “Unknown Sources.” That will let you install APKs downloaded from outside the Play Store. Some of the popular ones are the Amazon Appstore, F-Droid, and APK Mirror. Amazon offers a fair number of paid apps for free, and F-Droid is for free and open-source software. APK Mirror re-hosts free APKs so you don’t have to wait on staged rollouts and can get old versions of software.

Save Offline Maps

Google Maps includes support for saving maps offline, and the feature was recently expanded to be more powerful. It’s not easy to find, though. Find the area you want to save offline, then tap in the search bar at the top of the screen. Close the keyboard and scroll to the bottom and you’ll see the option to download. The app will bring up an outline to indicate the area that will be downloaded and estimate how much space it will take up. The offline data will include streets, basic points of interest, and the ability to use turn-by-turn navigation.
How to download YouTube videos on JioPhone

JioPhone is among the popular feature phones in the market today and it runs on Kai OS operating system. It comes with a pre-built app store from where users can download apps and games designed for the handset.


How to download YouTube videos on JioPhone


The handset comes with a YouTube app that allows users to watch their favorite content but at times, you need to save some of the videos to watch later or when the internet is not available. The YouTube app on JioPhone also allows users to download or save videos to view them offline.


Before downloading videos using YouTube app make sure to download and install the KaiOS 2.5 on your JioPhone. Also, ensure that you have an active internet connectivity.


1. Open JioStore and download the latest version of YouTube app

2.Once downloaded, open the app and search for the video you want to download

It is worth mentioning that JioPhone does not feature a touch display and hence the entire app navigation is based on an old school D-pad.

3.After the video is open and loaded, navigate to the video URL and add ‘ss’ in front of it and press Ok.

4.It will then redirect you to another website on JioPhone, scroll down, select the quality and select the download button.

WhatsApp Working to Add Fingerprint Security for New Web Sessions, Latest Beta Fixes ‘Recently Used Emoji’ Issue

WhatsApp is working on a feature to ensure that no one secretly creates a new session when temporarily using your phone.


WhatsApp is reportedly working on a new feature that allows users to secure a new WhatsApp Web session using their fingerprint. This looks to improve the overall security of your chats, keeping others from creating new web sessions without your knowledge. This new feature was spotted to be under development in the latest beta. The new WhatsApp for Android update also brings a fix for a bug that erased recently used emojis every time an update was installed on the app.


WhatsApp Working to Add Fingerprint Security for New Web Sessions, Latest Beta Fixes ‘Recently Used Emoji’ Issue


WABetaInfo has dug into the latest WhatsApp 2.20.200.10 beta for Android to discover that the instant messaging platform is working on the ability for users to confirm the creation of a new WhatsApp Web session using their fingerprint. This feature essentially looks to elevate the privacy and security of users ensuring that no one secretly creates a new session when temporarily using your phone. The tracker says that WhatsApp is currently working to implement the feature and it will be available in a future update. This means you may not be able to spot it even if you're on the latest update.


The latest WhatsApp 2.20.200.10 beta for Android update also brings bug fixes for a ‘Recently Used Emojis' issue that plagued several versions after 2.20.200. The bug erased all recently used emojis every time a WhatsApp update was installed. This bug has reportedly been fixed with the WhatsApp 2.20.200.10 beta for Android update.

The recent WhatsApp 2.20.200.6 beta for Android update a few days ago introduced a new sticker pack called Usagyuuun in the default sticker list inside the app. This animated sticker pack has been created by Quan Inc and is live for all new beta users on Android. This pack has a white cartoon character that depicts feelings of joy, anxiety, sadness, love, and a lot more. WhatsApp is also reportedly working on bringing a new Wallpaper section with the ability to set different wallpapers for different chats.

How to Download YouTube Videos in Bulk

 YouTube is the go-to video platform for watching movie trailers, launch events, music videos, gaming streams and so much more. But at times when you don't have access to the internet, you can always rely on watching YouTube offline, i.e. by saving them locally on your device.

Back in January, we have already told you about ways to download YouTube videos for offline viewing, and so in this article, we are going to take it a notch up. This time around we have found a few ways that let you know how to download YouTube videos in bulk. Keep reading this guide as well as show you how to download YouTube playlists.

Before you proceed, make sure that you only download YouTube videos with creators' permission. You should always respect the work of the creator before downloading videos and should use the files responsibly.

how to download YouTube videos in bulk

Download YouTube videos in bulk via an app

If you are looking for an app for your computer that can download YouTube videos in bulk, then don't look any further than 4K Video Downloader. Although this one is a paid app, its free version is ad-supported and offers a lot more than just downloading YouTube playlists. Follow these steps to download YouTube videos in bulk on Windows or Mac.

  1. Download and install 4K Video Downloader and open it.
  2. Now open any YouTube channel on your computer > click Playlists > right-click any playlist and click Copy Link.
  3. Switch to the 4K Video Downloader app and hit Paste Link. Then click Download Playlist.

4K Video Downloader supports multiple file formats and you can also use this app to download videos from other popular video-sharing platforms such as dailymotion, Vimeo, Facebook, etc.


Download YouTube videos in bulk via a website

If you can't install an app on your computer, you can still download YouTube videos in bulk via YouTubePlaylist.cc. Follow these steps to download YouTube videos in bulk on your Windows or Mac.

  1. Open any YouTube channel on your computer > click Playlists > right-click any playlist and click Copy Link.
  2. In a new tab, visit YouTubePlaylist.cc and create a new account.
  3. Once that's done, paste the YouTube link in the search bar on the YouTube Playlist website and hit enter.
  4. Let the website finish processing. After it is done, all the files will be ready to download. All you have to do is to tick All Title Video and you're set.

Besides downloading the videos in bulk, there's also an option to cut and download a certain duration of individual videos. YouTubePlaylist.cc supports downloading videos in various file formats and apart from YouTube, you can also download videos for offline viewing from other video sharing platforms such as Vimeo, dailymotion etc.

Download YouTube playlists using Videoder on Android

If you are an Android user, follow these steps to download YouTube playlists using the Videoder app.

  1. Download and install the Videoder app on your phone.
  2. Open Videoder > tap YouTube in the top bar > open any YouTube channel.
  3. Once the YouTube channel is loaded, tap Playlists > tap any playlist > hit the download button > tap Download.
  4. Alternatively, you can copy the playlist link via a browser or the YouTube app and then paste it in Videoder to start the download.

Download YouTube playlists on iPhone

Sadly, there isn't an app like Android that lets you download YouTube videos in bulk on an iPhone's local storage. If you are an iPhone user and you still want to download YouTube playlists in bulk, you can follow these steps.

  1. On your iPhone, go to the YouTube app and visit any channel.
  2. Go the channel's Playlists tab > tap any playlist t > hit the download button to save all the videos at once. This method also works on Android devices.

These are some of the easy ways that let you download YouTube playlists for offline viewing on your phones or computers.

How to Transfer Files Between Two Android Phones

 For almost a decade, Apple users have had AirDrop that allows users to share files between Apple devices in a jiffy. Now, Google has also come up with its own version of AirDrop for Android called Nearby Share. Google has been working on this new file sharing feature since 2019 and now it is finally available for a bunch of Android smartphones. In this guide, we tell you everything you need to know about Nearby Share on Android.


How to Transfer Files Between Two Android Phones


Nearby Share: Supported devices

Google says, Nearby Share is available for phones on Android 6.0 or higher. To check if your Android phone supports this new feature, follow these steps.

  1. Go to your phone's Settings > scroll down a bit > select Google.
  2. Tap Device Connections.
  3. If your phone does support Nearby Share, you'll find the option on the next page.
  4. Now go ahead and Tap Nearby Share to customise its settings.
  5. You can turn it on or off. You can also select your Google account as well as set the device name. Moreover, you can also set your device visibility, along with having a control on the data usage.


Nearby Share: How to use and transfer files

Whether you want to share a photo, a video, an app from Google Play or even your location from Google Maps, Nearby Share can handle it all. Wherever you spot the Share button on your Android phone, you can use Nearby Share. To know how to share files using Nearby Share, follow these steps.

  1. Open the file that you'd like to share > tap the share icon > tap Nearby Share. Your phone will now start searching for devices nearby.
  2. The person you're sending the file to will also need to enable Nearby Share on their Android phone.
  3. Once your phone detects the receiver's phone, you simply tap their device name. Simultaneously the receiver will need to tap Accept on their phone to start the transfer.
  4. Within a few moments, depending on the files you have shared, the transfer will be complete.

This is how you can share files between two Android phones using Nearby Share.

How to Stop Amazon From Collecting Your Data?

While Amazon has built a successful business around its online marketplace, have you ever thought how this company became so successful? A part of the answer is collecting user data. We were quite surprised to find out that many elements from our Amazon profile data are visible to the public.

Your Amazon profile consists of your bio, social links, shopping lists etc. and this is why you should make it private. It is always recommended to protect and anonymous as much information as it is possible. In this article, we are going to tell you how to make Amazon profile private and how to delete your Alexa voice commands from Amazon servers.

How to Stop Amazon From Collecting Your Data?

Make your Amazon user profile private

Follow the steps below to know how you can control what's visible to others on your Amazon profile.

  1. Visit Amazon.in and go to your Account.
  2. Under Ordering and Shipping Preferences, hit Profile.
  3. Once your profile page is loaded, click Edit your public profile.
  4. Your personal information such as your bio, occupation, social links remains public on Amazon. It's best to remove all personal information from this page for privacy.
  5. Click Edit privacy settings > click Hide all activity on your public profile > hit Save.
  6. Now click Back to public profile. You can also click See what others see to check how your public profile looks like when someone visits it.

Make your Amazon wish list private

There are two lists on Amazon — shopping list and wish list. You need to make sure that these lists are private because if they are public, anyone can search for your name and take a look at your things you want to buy. Follow these steps.

  1. Repeat the earlier steps and go to your Amazon profile.
  2. Open your Shopping List or your Wish List.
  3. Click More and hit Manage List.
  4. From the pop-up that appears, right next to Privacy, make sure it is set to Private.
  5. Hit Save Changes and you're done.


Hide your Amazon browsing history

Your browsing history includes all the things you have recently searched for on Amazon. You need to turn this off because this is the information that helps Amazon to target ads. Follow these steps.

  1. Visit Amazon.in > hover the cursor over Accounts and Lists > click Your Recommendations.
  2. In the top bar, hit Your Browsing History.
  3. Next, click on Manage history > click Remove all items from view and you also disable Turn Browsing History.
  4. One more thing you need to turn off is Personalized ads. To do that, go to your Account. Under Email alerts, messages and ads, click Advertising preferences.
  5. On the next page, choose Do Not Personalize Ads from Amazon for this Internet Browser.

Delete yourAlexa voice recordings

Amazon's Alexa voice assistant relies on listening to your voice and recording each one of your voice commands. Whether you are using Alexa on an Echo device or a smartphone, if privacy is a concern, make sure you follow these steps to make sure that Alexa is not recording your user data.

  1. On your smartphone, open the Amazon Alexa app, available on both Google Play and App Store.
  2. Sign in to your Amazon account that's synced with your Echo device, in case if you have one.
  3. Once you've signed in, hit More and go to Settings.
  4. Select Alexa Privacy and tap Manage Your Alexa Data.
  5. On the next page, scroll down and disable Use of Voice Recordings and Use Messages to Improve Transcriptions under Help improve Alexa.
  6. To delete existing voice recordings, go back and tap Review Voice History.
  7. Set the date range to All History and tap Delete All Recordings for All History.
  8. You can Enable deletion by voice as well that lets you delete each and every recording of yours by giving a simple voice command.

These were some of the important steps that you need to follow to stop Amazon from collecting your user data.

How to Video Call on WhatsApp Messenger

Group video calling on WhatsApp allows multiple users to connect at once.

WhatsApp, one of the most popular messaging apps in the world, isn't just popular for texting or voice calling. WhatsApp users also have the option to make video calls. The video calling feature is free on WhatsApp and to get started all you'll need is a working internet connection. The best thing is that WhatsApp Web video call is possible too. Follow this guide as we tell you how to make video calls on WhatsApp.


How to Video Call on WhatsApp Messenger


WhatsApp: How to make video calls from a smartphone

With WhatsApp, you can make video calls to individual contacts or groups. The process is pretty simple, just follow these steps.

  1. Open WhatsApp and select a contact to video call.
  2. Open their chat and hit the camera icon up top to place a video call.

While on a one-on-one call, there's also an option to add other people to the call. 

Here are the steps...!

  1. While on a WhatsApp video call, hit the add participant button in the top right.
  2. Choose a contact > tap Add.

Besides, adding contacts to one-on-one calls, you also get the option to start a group video call. Follow these steps.

  1. Open WhatsApp, select a group chat and open it.
  2. Once the chat is open, hit the camera icon up top to start a video call with the group.

As of now, WhatsApp supports up to 8 participants for group voice or video calls.


WhatsApp Web Video Call

To start a video call via WhatsApp Web, follow these steps.

  1. Open WhatsApp Web and login to your account.
  2. Hit the vertical three-dots icon and click Create a Room.
  3. You'll see a pop-up, go ahead by hitting Continue in Messenger. Note, you don't need a Facebook account for this to work.
  4. Now create a room and you'll be ready to start a video call.
  5. Just share the video call link with others on WhatsApp.
  6. To create a room with a specific contact or group, open that chat window, hit the attachment icon and click Room, which is the last icon in the list.

Facebook's Messenger Rooms feature allows video calls for up to 50 users at a time.

This is how you can make video calls via WhatsApp on your phone or your computers.

How to download and send Ganesh Chaturthi WhatsApp Stickers

WhatsApp Stickers have become a good option to wish and greet someone on some special occasions. As we all know Ganesh Chaturthi is here and if you are looking to download some good WhatsApp Stickers for Ganesh Chaturthi, follow out step-by-step guide:


Pre-requisites:
  • Latest version of WhatsApp
  • Android smartphone
  • Working internet connectivity


Steps to download and send WhatsApp Stickers

1. Open WhatsApp on your smartphone and head to any chat window

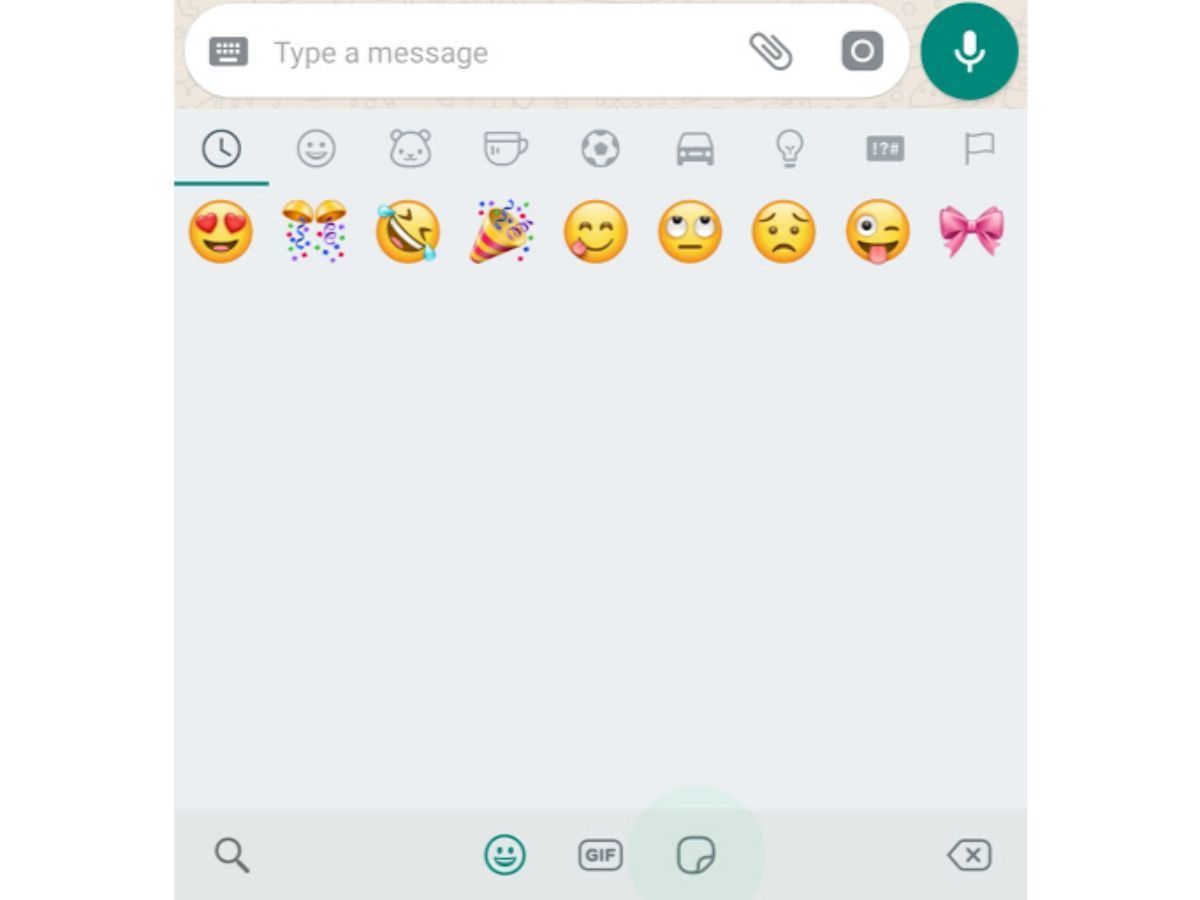
2.Now, tap on the 'Smiley' icon placed at the left corner of the typing area to access existing sticker packs

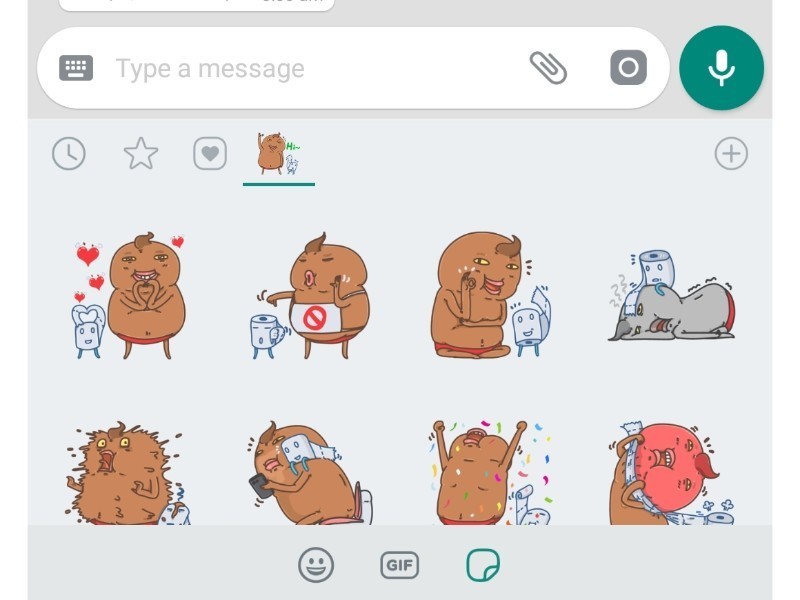
3.Now, tap on the stickers icon placed next to the GIF button below.

4.Hit '+' icon from the top-right of the Stickers section.

5.Scroll down to the end and tap on the 'Get more stickers.'

6.It will then redirect you to the Google Play Store

7.Search 'WhatsApp stickers for Ganesh Chaturthi and download anyone you like

8.Once downloaded, hit Open button and add them to WhatsApp

9.Once done, head back to WhatsApp and send the sticker


iOS users can simply ask their Android friends or use their secondary Android smartphone to go through the above-mentioned steps and send them a few stickers and then can save them as Favourites by long pressing on them.

Everything you need to know Google Pixel 5

Google Pixel 5 could be made available in green and black color on September 30. The Pixel 4a 5G could also be launched on the same day in a single black colour variant.

Google recently launched the Pixel 4a and also announced that it working to bring the Pixel 5 and Pixel 4a 5G to the market later this year. And now there are reports that suggest the phone could be launched a little earlier than it was expected before.


Everything you need to know Google Pixel 5

Earlier, speculation was rife that the phone could be launched some time in October, but now a new report claims the phone will be launched on September 30. Coming courtesy of trusted tipster, Jon Prosser, the new leak reveals this new launch date for the device.

The new leak also reveals that the Google Pixel 5 could be made available in green and black color on September 30. Further, the leak says that the Pixel 4a 5G will also be launched on the same day in a single black colour variant. However, another white color variant of the Pixel 4A 5G is being tipped for October availability.

Apart from this, there are some other details that are also known about the phone. Earlier, the Google Pixel 5 has been spotted on a benchmarking website, and as hinted at in the past, the phone could come with a mid-tier Snapdragon 765G SoC.


The benchmark shows that the Google Pixel 5 will feature 8GB RAM and a Snapdragon 765G SoC. The listing further shows that this device named ‘Google Pixel 5' is running Android 11. Interestingly, this is the same processor that has been used on OnePlus Nord.

The listing comes courtesy of AIBenchmark, which also shows that the new Pixel device performs almost as well as the last two Pixel flagships. Interestingly, this isn't the first time we are seeing rumours about the Pixel 5 coming with the Snapdragon 765G. Earlier, we've read a number of reports making the same claim.

As for the other specs, Google Pixel 5's screen is expected to be around 5.8-inches. The display is expected to run at 90Hz, which will bring it on par with a number of flagships in the market. There are also suggestions of the Pixel 5 getting the slightly more powerful Snapdragon 768G SoC.

But before we start getting too excited about it in India, it would be prudent to know that the phone will not be making its way to the Indian market. Google has also announced that it won't be launching the Pixel 4a 5G in the country. Instead, the Pixel 4a 4G variant will be launched in India later in October this year.